Friday, 2 August 2013

Summer Outfits (I)

Hey guys!

So, surprisingly in England the weather has been amazing so we have been out and about with family and friends. So here's an insight to what we've been wearing and hopefully we inspire you!


Brightly coloured and printed shorts are perfect for the summer and are great for outings where you'll be moving about a lot like a themepark or sightseeing.

Aztec shorts - Forever 21
Sheer black - Forever 21
White knit top - H & M
Rose pink shorts - Levi's
Unisex Aviator Sunglasses- Ray Ban


A summer dress is great for a family BBQ or garden party. Floral dresses are in for the summer and if it gets chilly through the day throw on a denim jacket or a knit cardigan.

Floral dress  - Forever 21
Denim jacket- Topshop


High-low dresses are easy and cute for days out especially with a statement necklace or belt worn to accentuate the waist and materials like chiffon are light materials which are great for the heat.

Royal blue high-low dress- New Look
                        Gold chain- New Look

The day we headed out to the beach was quite chilly so we thought maxi dresses were summery and would keep us warm at the same time. Bright coloured maxi skirts can be worn with practically anything like a simple white tee, detailed crops tops or crotchet tops.


Coral maxi           -New Look
Magenta maxi     - New Look
Turquoise maxi   - New Look
Black crop top     - New Look
Crotchet top         - New Look
White detailed top- Miss Selfridge

 Hope this helped and there's definitely more to come!

Ace Fashion
xox


Tuesday, 23 July 2013

Dream Catcher Nails


Hey guys,


Sorry we haven't posted lately - to make up for this we decided to do a nail tutorial on these dream catcher nails. I did this summery nail design when I went out with my friends and I got a lot of compliments on this design so I thought I would share it with you guys - so enjoy!  


These are the nail varnishes I used:
Barry M - Blue moon
Missguided - Missbehave Pink
Rimmel London - Peardrop
Rimmel London - Black Cab
OPI - Basecoat and Topcoat


1) First apply a base coat to protect your natural nails. Then add 2 - 3 coats of the nail varnish onto your nails. You have to make sure that it is opaque


2) On your middle finger and your pinky finger you will have to do the feather - for that you need to draw a line with a striper going from the corner of your nail to the opposite corner.


3) Again using a striper paint lines coming out of the line. Do some of the line fainter than the other ones so that it gives the effect of some of them being lighter and soft.


4) On your index finger and your ring finger you are going to paint the actual dream catcher. For this at the end of your nail using a black striper or a toothpick you have to paint a semi circle. Within the semicircle draw crosses. 


5) Draw lines coming down from the semi circle. On these lines using a dotting tool or a toothpick put pink dots on the lines (if this design in on the green nail) or green dots on the lines (if this design in on the pink nail) so it shows the beads on a dream catcher.


6) On the crosses within the semi circle use the nail polish you used on the middle and pinky finger to put the dots on - and you are done!


I hope you guys enjoyed this cute summer nail design and you can definitey use this design to impress your friends. I hope you will have as much fun as I had when doing this design! 

Ace Nails

Friday, 14 June 2013

STAINS! We all hate them

Hey guys,

We are really sorry that we haven't posted in a while - we've had those horrible summer exams! But dont worry, exams finish very soon which means more blog posts - YAY!!


I recently bought the Cosmopolitan Blend Perfection Sponge which is supposedly a dupe for the infamous beauty blender.  This sponge is AMAZING! I use it with my bobbi brown liquid foundation and the foundation looks so natural. I really didn't have any complaints about the sponge that was until this happened:
I am one of those people that absolutely HATE stains and I hate using anything 'dirty' on my face. For this reason, I wanted to find a method to clean your beauty blender. I did a lot of researching and almost bought the cleanser which cost £13 (on amazon). I'm glad I didn't because I read reviews on the internet saying that the cleanser did nothing and after experimentin, I found a quick and cheap way of getting rid of these amazing sponges.

1) Start by running your sponge under a tap


2) Squeeze the excess water


3) Take a tiny bit of hand wash or a mild shampoo. I used the dettol cucumber splash hydrating hand wash. The dettol no touch hand wash dispenses the perfect amount! 

4) Dab the sponge in the soap and swirl it around in your hand


5) Rinse the sponge under the tap again and squeeze out the excess.


You should be able to see all the foundation that was locked up in that sponge. You might have to repeat this process again but once the sponge looks clean, you are all done :)


That's it! Quick, easy and most importantly CHEAP. 
We have a few DIYs coming up so make sure to check back.

Ace Nails
x

Thursday, 30 May 2013

Small Haul

Hey guys!


So a few weeks ago, we went to London for a shopping spree mainly to pick up a few summer essentials. Firstly, we went to Westfield Stratford, one of our favoured shopping places, only because you can practically find every shop you can imagine! Some our favourite shops include Forever 21, Vero Moda, New Look, Pull and Bear, H & M and Urban Outfitters because you can find all the best trends all at reasonable prices. 


Pastel pink dress- Forever 21: £19.75
Denim dress- Forever 21: £19.75


So we have a busy summer ahead of us, as we're heading out to a few concerts, festivals and parties as well as a week trip to Norway for a wedding, so we kept our eyes open for some summer must-haves.

A denim dress is a summer essential and we loved this dress from Forever 21, especially with the lace cutout and cinched waist. This will go perfect with a simple statement necklace, the top button done up, a pair of biker boots and your hair up in a top knot.


Another must-have is a pastel dress. When we saw this dress, we fell in love with the colour and we dont really own anything in the same style. Close up, the dress has a crotchet-type effect and fits tightly down to the bust then flows out. The good thing with this dress is you could pair it with a cute pair of pumps for a casual day out or  with a leather jacket and pair of heels for night out.


Aztec Shorts- Forever 21: £16.75
Black Military Shorts- Forever 21: £5.99
Your summer wardrobe isn't complete without a pair of printed shorts or high-waisted shorts.

Aztec shorts are the next big trend and we loved these shorts with the black/white print and frayed ends. You could keep it simple with a black tank tucked in and statement necklace and we will do other stylings in another blog.

The best thing about Forever 21 is that it constantly has sales and we managed to pick up a pair of cute black military shorts for £5.99 and you could practically style these with anything!
H & M- £7.99


The last shop in Westfield we visited was H&M, in hope to find a pair of new sunglasses but were slightly distracted by this cute Bohemian style tank. We really liked the braided straps and thought it would look good with a bandeau and tied up to the side with a maxi skirt or a pair of white high waisted shorts.

Stay tuned for 'How to Style' for these summer clothes!
After spending half the day at Stratford, we decided to hit up Selfridges on Oxford Street, in the hopes to find a Rebecca Minkoff bag, but turns out there wasn't even a Rebecca Minkoff section! But we weren't going to leave empty handed, so we hit up the make-up section, which is like beauty heaven!
Tutu- £19.00
5 Honey- £30.00
Bobbi Brown is great for foundation and it's our second time purchasing this product and the service is amazing, so make sure to ask for your suited colour.  The lipstick on the left is a pretty colour for summer!


Rose Surprise- £22.00


Another company which is great with lipgloss is Dior. This sheer babypink lipgloss is super glossy and quite pricey but totally worth it, because it has lasted a very long time. If you don't mind pricey products make sure to check the whole range or check out the YSL lipstick range.

We ended our busy, exhausting but totally worthwhile day by grabbing a few cheeky cupcakes from 'buttercup'. Personally, I'm a chocolate lover and went for Chocolate Purist which was so delicious, words cannot describe and my sister picked up a red velvet cupcake. If you ever pass a buttercup shop, we definitely recommend trying their cupcakes!

Sorry for such a long blog and I'll try to keep them short next time. But for the time being, keep smiling and make sure to check back soon!

Ace Fashion
 xox

Wednesday, 29 May 2013

Mint Bow Nails


Hey guys,

I'm really sorry I haven't posted in a while. I have exams and unfortunately don't finish till the end of June. However I will try to blog as much as I can :) This nail design is what I wore on my birthday and I received a lot of compliments so I thought I should create a tutorial.

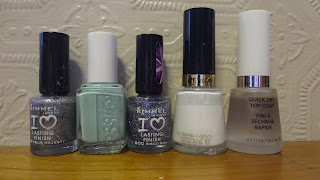
These are the nail polishes I used:
Rimmel London - Your Majesty
Essie - Mint Candy Apple
Rimmel London - Disco Ball (optional)
Revlon - White on White
Revlon Quick Dry Top Coat


1) To start off, apply a base coat to all your nails to protect your nails and then apply two coats (or more - you need it to be opaque) of a mint nail polish.


2) For the next step, you have to find a sponge material. Those make up applicators that you get from eyeshadows are perfect. Take your silver nail polish apply on the sponge material.


 3)Take the sponge applicator and dab on the tip of all your nails except the ring fingers. Make sure to dab more right at the tip of your nails - you want a 
gradient look.


You want to end up with something similar to this:


4) On your ring fingers you are going to create a bow. To do this, start off by making straight lines that are perpendicular to each other. I wanted the bow to be more to one side but it looks just as good having the bow in the middle. 


5) Next you add the bow. To do this, create a sideways '8' on one side of the horizontal line making sure the centre of the '8' aligns with the point where the two lines meet. From that point, create two curvy lines going towards the end of the nail.


6) This is the fun part! using a dotting tool or toothpick, place a dot of top coat in the centre of the of the bow. Using that same dotting tool or toothpick, pick up a gem and place on the dot. 


And this is what your ring finger should look like:

7) To finish off apply a liberal amount of your favourite top coat. This part is important as it makes sure you gem is not going to budge and protects your nail design. For me the gem stayed put for 10 days with the Revlon top coat. 


You may realise that I didn't end up using the Rimmel London nail polish in Disco Ball. This is because I felt that it would give too much of a sparkle but if you love glitter, make sure to add that nail polish on top of the silver polish. 

I hope you do try out this nail design and enjoy it as much as I did. We have a haul coming up soon so make sure to check back! 

Ace Nails
 x

Wednesday, 1 May 2013

My First Nail Design - Prom Inspired

Hey guys,

Here is my first nail design. I thought it was too easy for a tutorial but I think it would look amazing for all you girls going to prom. These nails are fun, sophisticated and elegant and I really hope you enjoy them :)


Here is an image showing you all the nail polishes used:


Sally Hansen Diamond Strength Basecoat
Barry M - Strawberry
Revlon - Sparkling
Revlon Quick Dry Topcoat

As you can see they are all drugstore nail polishes and if you want me to review them, make sure to leave a comment

1) Apply a basecoat to protect your nails. This step is a must if you are using darker colours as they can stain your nails
2) Paint two coat of your base colour (or till the base colour is opaque)
3) Apply two coats of the glitter nail polish on the ring finger
4) On the other nails, put glitter nail polish only on the tips
5) Finally apply your favourite topcoat to protect your design and ensure your nails lasts all night

I really do like this nail design especially since it works on all nail lengths. If you have any requests for me, please leave me a comment.

Acenails
x

Thursday, 24 January 2013

The beginning - get to know me

Hey guys,

I'm just a teenage girl from England who loves nail art and fashion and wants to share her experience. If any of you guys are interested in nail art and fashion make sure to follow me on my journey. I am new to blogging so if any of you have any tips make sure to comment on this post.

Thank you for reading this post

Ace Nails
x